You can’t edit the WooCommerce checkout form by default. However, you can edit it using plugins like Checkout Field Editor. Many similar plugins let you add or remove fields in the checkout form.
But what if you need more customization? For example, showing some fields only when a condition is met, such as ticking a checkbox? Many plugins offer this feature in their pro versions, but you or your client may not want to pay for such a simple feature.
In this tutorial, I’ll show you an easy and completely free method to add conditional fields to your WooCommerce checkout form.
Table of Contents
Example Scenario
Let’s look at an example. Suppose I want to find out if a customer is buying a product for their business. I want to add a checkbox to the checkout form labeled, “Are you buying as a business?”
If the customer checks that box, it will show fields to fill out. In this case, I want to collect the Business Name, Legal Address, Registration Number, and Bank Account details.
Let’s see how this can be done.
Steps to Add Conditional Fields
We’ll use a free plugin called Checkout Field Editor (or another similar plugin) along with some custom code.
This method simplifies the process of adding new fields to the checkout page. If you’re not very familiar with coding, you can still follow this method easily.
Step 1: Install and Active the Plugin
Step 2: Add the Checkbox and Fields
1. Navigate to WooCommerce > Checkout Form.
2. First, let’s add the checkbox by clicking Add Field.
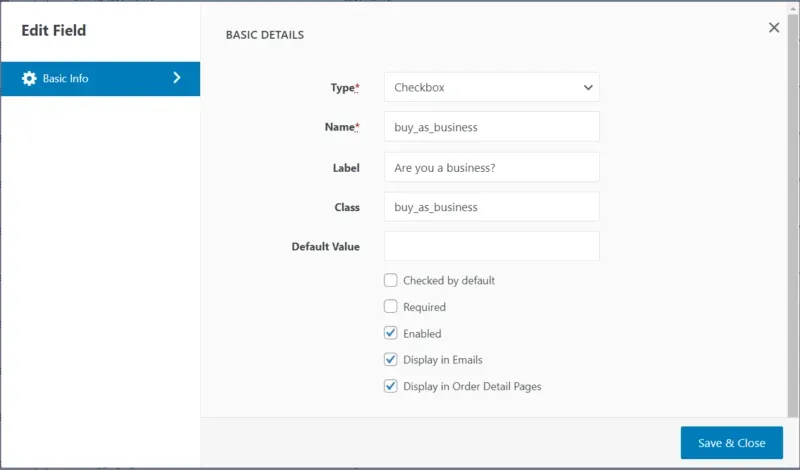
- Select the type “Checkbox.”
- In the Name field, type buy_as_business. You can choose any name, but it should be relevant and use underscores. Make sure the name is unique and doesn’t match any other field. Remember, this is not the checkbox label; it’s the name of the input tag.
- In the Label field, type the text you want to display. In my case, it’s “Are you a business?”
- The Class field is important because we will use it later in our custom code. Follow the same rules as for the Name field. The Name and Class can be the same, but they must not match any other fields. I will use buy_as_business here too.
- Leave the Default Value field empty.
- Uncheck the Required checkbox. You can leave the other settings as they are.

3. Add the other fields in the same way, but remember to:
- Change the type as needed (e.g., text for Business Name).
- Add a class for each field like
business_name,reg_no, etc. - Remove the required tick for these fields. This will add “(Optional)” text after the input fields. If you want to remove that, just add this CSS:
span.optional {display: none;}
Here are the fields I’ve added:
- Business Name
(class: business_name) - Registration No.
(class: reg_no) - Legal Address
(class: legal_address) - Bank Account
(class: bank_account)
Ensure these fields appear below the checkbox field in the correct order.

We are done creating the fields. You should now see the input fields below the checkbox on the checkout page. Next, we will make the checkbox toggle to hide and show those fields.
Step 3: Make the Checkbox Toggle Fields with JavaScript
Now, we’ll use a bit of JavaScript to show or hide the fields based on the checkbox state.
- Install a plugin like Simple CSS and JS to add custom JS.
- Copy the code below. Replace
.your_checkbox_classwith your checkbox field class, for example.buy_as_business - Also, replace
.your_field_class1, .your_field_class2, .your_field_class3with the field classes you added, separated by commas, like.business_name, .reg_no, .bank_account, .legal_address
document.addEventListener('DOMContentLoaded', function () {

    var businessCheckbox = document.querySelector('.your_checkbox_class input[type="checkbox"]');

    // Replace .your_checkbox_class with your checkbox class, for example: .buy_as_business

    // Example: var businessCheckbox = document.querySelector('.buy_as_business input[type="checkbox"]');

    var businessFields = document.querySelectorAll('.your_field_class1, .your_field_class2, .your_field_class3');

    // Replace .your_field_classes with the field classes using coma like .business_name, .reg_no, .bank_account, .legal_address

    // Example: var businessFields = document.querySelectorAll('.business_name, .reg_no, .bank_account, .legal_address');

    function toggleBusinessFields() {
        if (businessCheckbox.checked) {
            businessFields.forEach(function (field) {
                field.style.display = 'block';
            });
        } else {
            businessFields.forEach(function (field) {
                field.style.display = 'none';
            });
        }
    }

    businessCheckbox.addEventListener('change', toggleBusinessFields);

    toggleBusinessFields();
});
Now, we are done. The fields should only appear when the “Are you a business?” checkbox is checked.
Be very careful when adding the classes into the code. If you make a mistake, the code won’t work as expected. Double-check everything to be sure.
If it still doesn’t work, feel free to contact me. I’ll do my best to help you out.


