By default, WooCommerce puts the Add to Cart button below the product title on the product page. You might want to move it under the product image to fit your store’s design.
This tutorial shows you how to place the Add to Cart button under the product image easily.
Table of Contents
Code Snippets Place the “Add to Cart” Button Under the Product Image
We will be using WooCommerce’s hooks to remove the Add to Cart button from its default location and place it right under the product image.
The remove_action() function will take out the button from its original position, while add_action() will insert it in the new spot.
Copy the code and add it to your child theme’s functions.php file.
/*
 * Snippet: How to Add WooCommerce Add to Cart Button Under the Image (PHP Snippet)
 * Author: WP Blogr
 * URL: https://wpblogr.com
 * Tested with WooCommerce 9.3.3
 */
add_action( 'wp_footer', 'wpblogr_move_add_to_cart_button_under_image', 99 );

function wpblogr_move_add_to_cart_button_under_image() {
  if ( is_product() ) {
?>
    <script type="text/javascript">
    window.onload = function() {
        var galleryDiv =
        document.querySelector('.woocommerce-product-gallery');

        var addToCartButton =
        document.querySelector('.single_add_to_cart_button');

        if (galleryDiv && addToCartButton) {
        var addToCartForm = addToCartButton.closest('form.cart');

        // Move the form.cart under the image gallery
        galleryDiv.appendChild(addToCartForm);

        addToCartForm.style.marginTop = '30px';

        // Show the button after it's moved to the correct position
        addToCartForm.style.display = 'block';
                }
            };
    </script>
    <?php
}
}
This CSS hides the initial button from displaying. Also, add it to the style.css file of your child theme.
// CSS To remove default button
form.cart {
     display: none;
}
How to Add the Code Snippets
You should add the PHP code to the functions.php file and the CSS code to the style.css file of your child theme. If you don’t have a child theme, read this guide on How to Create a Child Theme.
Once you have the child theme, follow these steps:
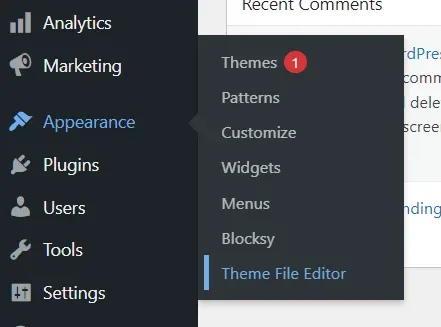
- Go to your WordPress dashboard.
- Hover over Appearance and click on Theme File Editor.

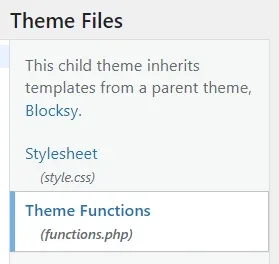
- On the right side, find
functions.phpandstyle.cssunder Theme Files. - Click on file names to add the code.

Paste the codes and click on Update File.
There are other versions of the code to achieve this. However, I found this code works for all the themes. I tested it with Twenty Twenty-Four, Astra, and Blocksy, and it worked with all of them.
If it doesn’t work for you for any reason, please leave a comment below. I will do my best to help you.


